Monday, March 24, 2014

Muse 5: Shock & Flowers

This was an unexpected musing. And an unwanted one.

I have a goal of making all my personal birthday and event cards ahead of time, in the previous month, ready to be sent. 52 Muses is part of reaching that goal. Here's something I don't do. I don't make sympathy cards ahead of time. 

Partly that's just superstition. As morbid as I can be in my humor and TV choices, it would just be weird. But more importantly it is because I feel a handcrafted sympathy card should be personal. It should reflect the person who has passed and who they were. 

Now, don't get me wrong, ANY expression of condolence no matter how awkward or brief or generic is a good one. And if you can get a small memory or piece of what they meant to you across, all the better. And that's easier to do at my studio table then face to face with a grieving loved one, so I try to put my all into it. 

A little over a week ago I came home in mid-afternoon to find several police cars near my condo unit. We have many elderly neighbors so a rescue vehicle is not unheard of. But this was 4 or 5 squad cars. As I pulled into my space an officer asked me not to park there as they had rescue units coming. It suddenly occurred to me that they were in my friend's home. She is older but an active and independent woman who had surgery a few weeks ago. I immediately got scared and asked if she fell. The officer said they had just come to do a welfare check because a friend of hers had called them and then he said a terrible, horrible thing. And the bottom dropped out of my brain.

The EMS came and went. The police asked questions. There was shock, there was guilt, there were neighbors milling around. I handed over the emergency numbers of her children that she had written in her scrolling handwriting. I had these in case she started to run a fever, or she needed a grocery run. Not this. Never this.

I know now there was absolutely no indication to me or anyone else who walked by her door that morning that help was needed inside. I don't have exact details but it seems to have been fast and nothing anyone could have done. But that doesn't make people feel any better.

Everything in my friend's home is white with touches of yellow and green. White carpet, walls, furniture. It looked like a magazine spread. But you weren't afraid to touch anything, it wasn't cold. There were family pictures and flowers. Her children were very important to her. Her husband had passed years ago, before she moved here.

When I sat down to make her card, I started with white. White base and white liner and white front. Then I punched a butterfly border along the front vertical edge and placed it over the cut edge, allowing the interior to overlap and the interior edge to show. I stamped green flowers on the front and inside. I stamped a sentiment on the front and inside. Then, using watercolor markers, I hand colored each flower yellow and added vines.

It was my tiny tribute to the woman she was.
This was made with Stampin' Up stamps and markers and a Martha Stewart punch.


Wednesday, February 26, 2014

Muse 4: Procrastination & Rodents


Those who have known me a long time know this:

I am awesome under pressure.

I am awesome in a crisis. 

If you sprain your ankle or your spouse leaves or you have emergency surgery, I'm your gal. I can immediately see what needs doing with the sharp eye of woman who grew up  with periods of nuclear family normality punctuated by sudden chaos and no clear leader. (At least that's how I internalized it.) It creates an ability to assess a situation in the moment and care for the others in the pack. I can stay calm and keep others calm, too. I am totally the one you want on your team in a zombie apocalypse.

However, being skilled at awesomeness-under-stress leaves you with two other fringe "benefits":
  • You think you can leave everything to the last minute and it will all turn out swell. 
  • You become addicted to the adrenalin rush of stress rewarded with accomplishment. 


That's not the good kind of stress, let me tell you. That's the kind that wreaks havoc on your heart and brain and produces that "cortisol" crap that all the weight loss commercials talk about adding weight to your mid-section. (Hey! Stop looking at my muffin top!)

So, you know how they say "adventure adrenalin junkies" go out and look for opportunities to get a rush by bungee jumping, free climbing, or pretending to be paparazzi while following Alec Baldwin? 

Stress adrenalin junkies procrastinate and then, in the last minute, attempt to come through with flying colors and get the "A". This is my opinion but I think we can all agree it could and should be proven as medical fact. And it usually ends not in accomplishment but in tears. Because this is not something we are planning for or prepared to handle should it come up. We're literally pushing it off and creating the scramble at the end. Which is completely different than an emergency. Importantly, I have learned to NOT do this in life. But in small ways it still sneaks through. (Hence, this blog.)

And now to the card. My friend G has a birthday in February. When I first knew her and asked G what day her birthday fell on she said, "I don't want to tell you, you'll make jokes." (She already knew me pretty well, I guess.) Finally, she admitted her birthday was Feb. 2. Which meant nothing to me. She said, "It's Groundhog Day." 

Now I would like to say in my defense that HAD SHE NOT SAID ALL THAT I wouldn't have made jokes. At least, not every year. I didn't even know that was Groundhog Day. But now I am committed. This year, I tried to be kind. I made a nice Groundhog card. Not the kind who forecasts more snow.

Here is where I procrastinated: I had the idea all planned out but did nothing to get it into physical form. I have been known to tell someone that something is completely designed and when they ask to see the sketch I point to my head. And it's true. The drawing board up there somehow holds onto detailed project plans for months even when I can't remember why I came in the kitchen, dammit.

This card I literally put off until the morning of a birthday breakfast. It was already belated. I was already running late. But I couldn't NOT bring the card. (This is my own personal thought police. She would not have judged. Teased, but not judged.)

So I pulled up the project that I had planned a month before on my brain's drawing board. (Wait, I think Sherlock calls it his "mind castle" which sounds much better.) So I accessed my "mind castle" and pulled out some kraft and white card stock, my Stampin' Up markers and my fussy-cut scissors. And look, it's the Martha Stewart Bird On A Wire border punch again! I told you it would be coming back! *

The front I made with two pieces of torn white card stock to represent the drifts. I dotted white ink pen for falling snow - also added to the tops of all the black sharpie hand lettering, as if snow had fallen on them. Inside, it is Spring!

I colored the birds into bluebirds and added a handwritten message, "The Groundhog says winter will end, and you still look like a Spring Chicken!" The pop up is a quickly drawn rodent, cut to shape and added to the pop up mechanism. (The card is meant to be viewed open and flat from the side.) If I had taken more time, the groundhog would have been larger. Furrier. Arms that didn't look like he was half-T-Rex. G poo-pooed all these comments at breakfast, because she is a good friend.

Further proof of procrastination? The photos herein were taken AT THE RESTAURANT on the table. I actually had to ask G for the card back so I could take pictures. I was called something politically incorrect like "Native American Take-r Back-er", meaning I was the cheating pioneer trader I assume. But I did give it back. 

I hope I inspired you to not put off for tomorrow what can be crafted today! A sense of accomplishment on time is much better than a sense of getting it done eventually!

Liza

*(I don't get anything for these links, BTW, they are there if you want to know more about the tools and supplies. Or my obscure references.)


Tuesday, February 25, 2014

Muse 3: Love & Trash


So my plan to get one blog up a week as I did projects was a fantastic one - until I realized I was catching up from, or getting ready for, events that included cards and gifts. And that the recipient would see them on the blog before they saw them in person....so....yeah.

I am planning out which procrastinated project to do and when to do it, to avoid this in the future. Meanwhile, here's a catch up blog! I'll post three cards this week and then sprinkle in the other projects until I am back on track.


Today I bring you a handmade
and hand colored pop-up card I designed as a one of a kind for my husband. He was out of town and came in late Valentine's day, which is not a big holiday for us. I didn't get around to making this card until the next week.

We like to bike rail trails and beach neighborhoods together. Something I am very much looking to get back to when the roads aren't covered in snow! He also likes crows, so these incorporate sort-of crows. Crow-like. Crow-inspired. :) They are from a Martha Stewart border punch of birds on a wire that I just purchased "pre-owned" from a fellow crafter. I cut them off the border after coloring them. (I have used this punch A LOT, bird fan that I am. See future projects for more uses.)

That's obviously the love, here's the trash. Funny story: My younger daughter tells me she isn't that crafty. She is a singer and very talented in all the arts but doesn't think she can make cards. And didn't seem interested. Last week I came home to find a beautiful pinwheel card with a mix of patterned paper, punched lace border element, and a hand made origami pinwheel embellishment on top of a gift for her BFF. She watched a youtube video and copied it. Like, right there and then. So, there goes THAT "I'm not crafty" theory. Her big complaint about the card? "The pinwheel stick isn't exactly straight." (No one else would have noticed, except possibly my husband. Their eyes have a naturally perfect bubble level in them or something.) 

Here's the funny part. She had cut a a few tiny pieces from the edge of a 12"x12" patterned sheet of gorgeous paper for the pinwheel. After she left I opened the garbage can and THE PAPER WAS ON TOP. Other than the tiny edge pieces missing, untouched. Not dirty (I checked, it was a new garbage bag). Not wrinkled. Just discarded. The crafter in me died a little and I rescued the paper. Yes, I dumpster dived for a .40 piece of paper and I am admitting it! That paper was used in this card. When she saw this card she said, "Oh, I had paper like that". I used it as a learning moment for "How to use every scrap of paper in other projects". Hopefully, I didn't turn her off making any more cards! (And I still have more left.)

Back to the card. I started with a Hero Arts bicycle stamp. I stamped two images. (Well, more than two and chose the best ones!) I colored them in with Stampin' Up watercolor markers. They have a brush tip and straight tip and I like them for detail work. There are a lot of good markers out there but I lean towards the Stampin' Up brand for every day crafting. 

I chose our favorite colors for the bikes. Our actual bikes are mountain/street hybrids in light blue and dark green but these images are vintage road bikes so I used poetic license. I added a "boy's bike" bar and a vintage suitcase on the back rack to one card. I also colored the background of the bikes the same as the background "sky" that the card would be so they would blend. I "fussy cut" (hand cut with small scissors) the bicycles out, leaving the basket off the "boy's" bike. The basket on the girl's bike stayed.

I fussy cut two scalloped edges from the green paper I had rescued and added those borders to the front and inside of the card to symbolize grass or hedges. I added a crow couple and sky to the front, and sky to the inside. The sky is just marker using brush strokes wherever I felt drawn. (No pun intended.)

I cut and colored two strips of heavy white card stock, one slightly shorter than the other. They match the sky so they are camouflaged. I folded about a half inch on each end back, opposite ways. Sort of a long "S" shape. I adhered one end to the back of each bike and the other end to the inside of the card, lining them up so one bike was behind the other and in front and they were riding above the grass. I added a crow stowaway on the vintage suitcase.

When you open the card, the bikes bounce a little, independently, which gives them great movement and is reminiscent of real bikes. They do get caught on each other but when I attempted to adhere them together it lost that movement so I took the risk. 

I didn't have a stamp sentiment I liked so I looked up bike quotes and love quotes on my smart phone and then wrote this saying in pencil, and went over it in marker. I erased the pencil lines and voila!

I made a matching envelope with markers, stamp, crow and all using the We R Memory Keepers envelope punch board. (Best.Tool.Ever. It makes my cards so custom. This is not a sales pitch, this board is very easy to use and fast and that's what I need!) 

I made this card while in a crafting group and someone asked me what my husband would do with this card. (There is a fear among all card makers that the recipient will look at your two hours or love and labor, smile, and throw it away. Or not smile and throw it away.) Hubby displayed it proudly and today asked me to put it somewhere it won't get damaged.


So Love & Trash. A belated Valentine's card made with discarded paper. I hope I inspired you!

Liza

Tuesday, January 14, 2014

Muse 2: Evicting Perfectionism/Sweet Sixteen


MUSE #2
So, this post is about procrastination and balancing your time. Therefore, I am not putting it off and it is in two parts.

Part 1: Evicting the Perfectionist

My younger daughter turned 16 in the Spring. She went to an event right around that time with her sister and friends and some photos were taken on a patio with container gardens of flowers. She is happy and smiling and in a sunny place, and she looks so natural. I thought it captured who she is at this time of her life. I created a Sweet Sixteen scrapbook layout page around one of those photos in early summer. And put it on an easel on my work space because I liked how it was progressing. But it needed something, and I couldn't decide what it was. And then, after a few weeks, I moved the easel off my work space. I added a few silk and paper flowers, but didn't actually adhere them. It still needed something. I took it off the easel, slid it into a paper tower where it wouldn't get ruined but could remind me it was there and remind me to feel bad about not finishing it. There was still depth missing, an element to bring it together and make it cohesive. I wanted it to be exactly right for her, make it something that could be displayed by itself not just in a scrapbook. It needed another splash of color or sparkle but I was afraid of adding more bright and bling and taking it too far. It's easy to add, but removing is a far greater hassle and only sometimes works out. I felt like my Muse had spoken and then got distracted by a butterfly and never came back to complete the mission.

Really, though, my Muse had been roughly shoved aside by my Perfectionist. And now it is January and my daughter will be seventeen in a few short months. So maybe I should complete this page and show her it's important to me and stop feeling guilty, which helps no one?


One thing I learned in my brief sojourn into art school was to "step awaaaaaaay from the art". When you have your face in the project, so close there is ink or pastel on your nose, and you are tweaking and adding and touching up and muttering under your breath about the play of light and triads and rudimentary blending, then you have become too involved. Or at least I have. You can't see the forest for the trees, as they say. Stepping away, getting a cup of tea, coming back and looking at it from across the room - the changes that need to be made become glaringly obvious.  Or when something needs to be left alone because it is done, that becomes incredibly apparent.


I have used this idea in other areas of my life too. It can be applied, literally or metaphorically, to anything that is stressing you out. An argument, a moral dilemma, a scrapbook page that has been sitting on your work space for several months, a project you want to complete.


In this case I had physically stepped away but I had not mentally stepped away. I let what started as a fun and pleasant project turn into a nagging regret. Like I don't have enough of those that I have to make more. And the Perfectionist wasn't going to just let me get away with finishing it and being happy with it as is. Noooooo, she was going to make sure I remained immobilized every time I looked at the thing. The control-freak, Perfectionist, has a motto -"If you can't do it exactly right, don't do anything and let it sit as clutter until you can." But, since perfection is an unattainable state, I can't. You see the vicious cycle, right?*


Obviously, when gathering my projects for this 52 Muses challenge, this particular Muse needed to tempted back and encouraged sit down and finish with me. Perfectionist was shown the door. (And in more ways than one. This week was supposed to be a different project because it "should" been be done next. But this layout was more important and I told Perfectionist to shut up.)


Part II: The project


Here is the before:


I loved the paper when I bought it, and the "Be Yourself" emblem at the top made me think of my daughters. An ivory bookkeeping type paper with  gray flourish detail
from Authentique Paper. I layered a botanical print vellum over the right side, and it all started out well. Next, I added some details that really made it pop:


The "be yourself" plaque was printed on
the page. I cut a duplicate from a second page of the
same paper and used a foam square to lift it above
the image and give it dimension, and inked the edge. The journaling is
computer printed on card stock and the border punch is the same one used
around the photo mat, different paper.


A Prima Julie Nutting Paper Doll stamp was the
original embellishment that inspired the theme of tulle and bling.
I cut her out by hand, colored the stamp, added liquid glitter by Stickles,
ribbon, a tulle overlay on the skirt,
a silk flower and a jeweled embellishment. Then I layered
her over kraft paper embossed with a Sizzix flourish and
some more glitter, and inked it to resemble vintage paper or leather.


A lace punch border layered with
a pleated tulle edge frames the photo.
The tulle echoes the skirt on the Paper Doll.
And there I stopped. I think it was June. When I moved the layout for the umpteenth time last week I said, "this is going to get ruined it you don't put it away and then it will all end in tears". I thought about my 52 Muses and added it to the priority list - if I put it away who knows if it would ever get done? The only way to truly fix a problem like this is to take action, which is easier said then done, I know.


I gathered some items and colors I had been considering and put together a "palette". I stepped awaaaaaayyyy and thought about what I wanted to accomplish. I am all for stream of consciousness scrapbooking and play-as-you-go when I am inspired or need inspiration. But when you are really stuck, sometimes a little outline helps you get better un-stuck.

Next, I laid out the flowers and when I was happy with the placement, I took a cell phone pic of them to refer to when I adhered them. I scooped them up and started on the layer that would go below them. This was the detail that had eluded me.


A crafting instructor friend, Liz Vellali, had posted the results of Paper Doll tag class she had hosted and the punches she used for a detail - a half circle from a We R Memory Keepers Mini 8 Punch. It was an easy and elegant way to add dimension and texture to a small project. I already had the embossed kraft paper behind the doll, but a punched semi circle would give another layer of depth that I was looking for behind the flowers. I chose to pick up the green in the ribbon, which would blend with the flowers and still show up between them.


The finished layout of semi-circle and flowers,
before adhering. I ran the flowers through a Xyron X, layered and adhered them.
I added clear Stickles to the centers to match the bling elsewhere but not compete with it. I also added clear Stickles the flourish behind the emblem, to balance the glitter on the page - most of it was on the lower half.
The finished product!
I admit I am pretty happy with it, and it's DONE! It took me so long I am going to frame it for a while - why stick it away after looking at it with guilt for so long?
Now I can look at it with pride!

Below I have added a couple of detail photos. My wish for you is that this inspires you to go find a project you enjoyed and like but now lurks in the back of your mind, unfinished. Take it out into the light and do SOMETHING with it. Take 5, 15, 60 minutes to work on it. You will thank yourself.


Finished flowers, detail


Finished emblem, detail


*I would like to credit Marla Cilley, the Flylady, with first articulating the perfectionism/immobilizing theory in a way I never could. Most people think of perfectionism as constant action, but sometimes it stops you in your tracks.

Sunday, January 5, 2014

Muse 1: Getting Started/Digging Out Wreath

MUSE #1


Fact: I am not a professional nor experienced wreath maker.

However, I had an idea for a cute little wreath for my door that would be a good post-Christmas and pre-Spring theme. Connecticut, as part of New England, has less snowfall than Maine and above. But we do spend a fair amount of time digging out, especially the last two years. Which led to my inspiration.

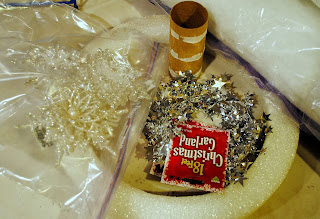
I gathered a few supplies and put them aside for a future project. And there they sat until today. So, to get this wreath out of a paper bag and into reality I put it all out on the table and then thought about how to proceed.


First, I called my Mother-In-Law, because, Fact: She is a professional and experienced wreath maker. She gave me a few tips including how to repair a crack in the Styrofoam circle of the wreath base. (Which is what happens when you leave a project untouched in a shopping bag for a month). She suggested I add glue to toothpicks and use them to connect the two sides together. 
Good as new! And now on to the steps...

Step #1: (Also a professional tip from MIL) Wrap twine or floral wire around the Styrofoam circle and tie of off each end. If, when the circle is covered, it breaks in the decorating process the twine keeps the circle from falling apart into pieces. Now I don't want to say that is a possibility with me or anything, (roll eyes here), but precaution is always advised when doing something new or fragile. And think of the frustration that is saved when a wreath is already covered in ribbon or fabric and then breaks apart mid-process. This saves you from having to start over from scratch or toss the whole thing!

Step #2: Cover the circle with fleece. I used a roll of "snow village" poly fleece similar to batting. I laid the circle down on the back of the fleece and, using pinking shears, cut a large square as if I was going to gift wrap it. Then I cut a "+" in the middle. I folded the four corners inside the circle over the foam and adhered with hot glue. Then I folded the outside corners in over the circle and adhered again with hot glue. I worked my around, tucking points of fleece over onto dabs hot glue. Then I trimmed the extra. I was not looking to make a tight fit, I wanted some play in it to look like snow drifting.

Step #3: Add sparkle. In this case, I wrapped silver star garland around the fleece covered circle. I twisted off the first end then wrapped it around the circle until I felt like I had enough on the background. I wanted it only as an embellishment in the background.

<----- This is what happens when the garland gets away from you.

Then I got it under control ----->

Step #4: Make the shovel. Take an empty toilet paper roll and cut about 1/4 off the roll. Flatten slightly. From the scrap, cut a small rectangle with another rectangle cut from the center. Paint both sides of the 2/3 of the roll and the rectangle with silver paint - I used Viva Decor Chrome. Let dry. 


Then cut an approximately 10" x 12" piece of brown card stock. (This technique not shown.) Run it through and wood grain embosser folder and machine like the Big Kick and ink it brown on the edges and to highlight the pattern. Add adhesive with a Xyron machine or tape runner, lay a piece of balsa wood, thin strip of card board or shish kebab bamboo skewer on one side for support. Fold the brown card stock in half lengthwise on the long edge, adhering it over the support. Hot glue the toilet roll curve to the bottom horizontally and the rectangle to the top as a handle. 

Step #5: Lay out the parts. I used plastic, glittered snowflake ornaments I found on sale post-holiday and moved them around to try and find the best arrangement. I glued the shovel first, since I wanted dimension with the snowflakes. Using pins and hot glue, I fixed the ornaments where I wanted them to go. 


Step#6: I added a twist of garland to the top center, after determining how I wanted it to hang. I wanted the wreath to hang so that the shovel was at a bit of an angle, like it is leaning on a wall between snowfalls. 

And the completed wreath on the inside of my front door.


Thursday, January 2, 2014

52 Muses

There is a t-shirt I see on crafter friends that says "Queen of Unfinished Projects". I prided myself on NOT having a claim on that throne. I started and completed most craft projects in a timely manner and sent out hand made birthday cards at the beginning of each month on a fairly regular basis.


Then I started a craft business.

A major portion of this business was handcrafted cards and gifts, something family and friends had encouraged me to do. Online, at fairs and in local shops I displayed cards and mixed media artwork. Friends' expectations got higher and they started telling me, "I better get some amazing cards now! (Wink, wink but no, really, I mean it!)" Instead nobody got any cards! Between orders, inventory and life, and not being able to bring myself to buy a store bought card, I opted out of giving them any. I started designing custom artwork for birthdays and other events and they still sit on the drawing board or halfway begun. Paid orders? Completed and shipped on deadline. Birthday gift for my husband? Not so much.


Last year I challenged myself to doing charitable acts and surpassed my goal. While I did the acts of charity for others, I got more out of it than I put in it as far as learning, accomplishing and feeling good about what I was doing. I also had the added honor of inspiring others to do a little more in their community.


And this personal challenge has some parallels. On the surface, it looks like I am just cleaning up my to-do pile. But I am hoping I can make my family, friends and myself happy by finishing these projects and bringing them to life and into their lives. And in the process bring myself some happiness, peace and learn some life balance in the craft studio.


Why 52 Muses? Mythology tells us there were nine Muses, sister Greek goddesses who were the deities of song, poetry, arts and sciences. Muse can also be a guiding genius or to turn something over in the mind.


This truly describes my design process in it's first stage. I can be watching TV, eating dinner with my family, driving, doing housework. Each step, materials, deletions and additions, how something will work, rip it apart and start over - it is all forming in my mind's eye. Eventually, in theory, that project becomes a physical stack of paper, fabric or other materials on my craft table and then gets formed into something close to what I envisioned. Or it takes a different tangent altogether but retains an essence of the original thought. 


And there's where I have been getting stuck, getting from the mental drawing board to the actual drawing board. This challenge is to help me get unstuck. Time, organization, whatever the stumbling block, I will have to pinpoint it and resolve it on a deadline.


And I hope you would cheer me along, join me or watch to see if I have any Pinterest Fails. Please follow the blog. I look forward to seeing you!